
Customer support always plays a vital role in any business. One of the best ways to keep your visitors satisfied is to offer live chat on your website. Sites that implement live chat are more likely to have relaxed and satisfied customers. Live chat is a quick and efficient way for you to engage with your visitors and help them out if there is a problem or any question about your products or services. The key to its increased efficiency is a chat agent that can handle many chats at once. This can save you a lot of money, too. To keep ahead of the competition, more and more businesses are implementing live chat.
There are numerous live chat plugins available today, but one stands out in terms of key features and adaptability. 3CX Live Chat provides a clear and user-friendly design for both customers and agents that leads to a professional experience. With almost two million installations, 3CX Live Chat is one of the most popular chat plugins you can use on your WordPress site.
This post will give you a complete review of the 3CX Live Chat WordPress Plugin with all its significant features.
What is 3CX Live Chat?

Your customers can ask you questions over the chat and get immediate answers or solutions to their problems and concerns. It instantly helps to boost your business's credibility and visitor satisfaction, especially since customers are fed up of never-ending call queues and slow responses over email. Instead, they want a quick and easy-to-use solution. With 3CX Live Chat you are equipped with one of the most reliable plugins you can have on your site. Backed up by 3CX system, the live chat plugin can confidently exceed your expectations.
Key features:
- User-friendly interface for both customers and agents
- Customizable chatbox: different color variations, option to put company logo, professional animations
- Opportunity to create offline message forms
- Storage system for your offline messages
- Create unlimited agents and set up departments
- Set up profile pictures for agents
- Option to accept or reject a chat
- Predefined responses when your chat is not in business hours
- Reply to a conversation even on mobile with 3CX Mobile Apps (iOS or Android)
- Assign chats to a particular agent or group of agents
With the new 3CX, you’ll get not only the plugin but also an accompanying 3CX Web Client that further enhances all the features of your live chat.
3CX StartUP Installation and Setup
For the first phase of the installation process you’ll need to set up 3CXwhich can be done through your browser in just a few steps:
- Sign up for your free account.
- Add your users or agents to the system and assign them roles (managers, receptionists, standard users). They will answer chat messages and use other system features – your first line of contact to the visitor.
- Determine if you’ll use a SIP Trunk, which is used for inbond and outbound calls. If you’ll be using the system just for Live Chat and internal communication simply skip this part and click on “Next”.
- Now you can start setting up your live chat by choosing the option “Yes” and selecting if you have a WordPress website or not. Enter your website URL and click “Set”.
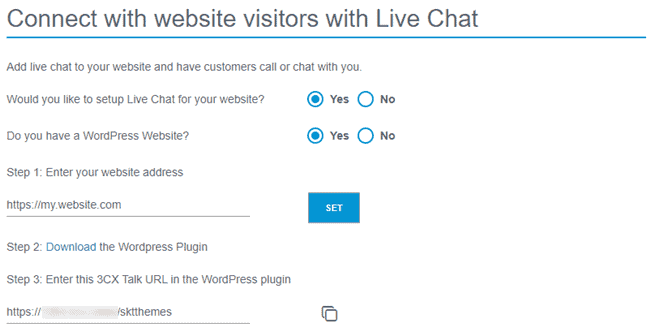
- You need to link the web client to the plugin, so download and activate the plugin and then copy the 3CX Talk URL and save it for a later stage. The 3CX Talk link is what is used to link your website to your 3CX account. It creates the bridge that carries the chats, calls and video calls. Everything is run through the browser so there’s no need for telephone calls.
- With that you’re done. Through the “Login” button you can access your dedicated 3CX Web Client which is the place all your customization options and chat messages are located.

Once you have access to the Web Client the first thing you ought to do is configure the Live Chat. Just like the general setup, it’s a pretty straightforward process.
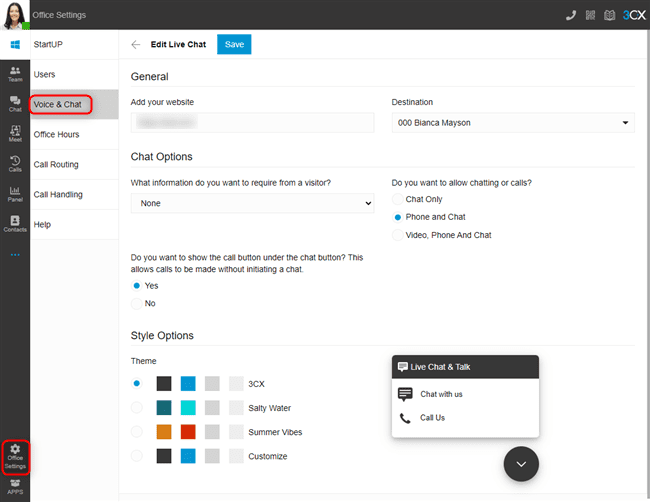

- To set up Live Chat so that calls and messages can be answered from the Web Client, go to “Office Settings > Voice & Chat” and click on the pencil icon.
- Your website address will already be populated from the wizard process, but you can change it afterward.
- The “Destination” field shows where live chat messages or calls will be sent. To change the “Destination”, navigate to “Office Settings > Call Routing” and choose your destination. By default, the live chat will be routed to a ring group, so anyone can pick up.
- Under the “Chat Options” section, use the drop-down selection to choose what information visitors need to provide.
- Use the radio buttons to choose if you want to allow “Chat Only”, “Phone and Chat”, or “Video, Phone, and Chat”.
- If you want the option for “Call Us” to be displayed immediately on the chat bubble, use the radio button to show or hide the option.
- Under “Style Options” choose from one of the 3 pre-defined themes or select “Customize”. For the last option, click on each of the color tiles and use the pop-up color picker or enter your RGB numbers.
- Use the preview of the chat bubble to interact and test the functionality and click on “Save” to finish up.
There are other features you can explore within the Web Client, but first you’ll need to hop over to your WordPress backend to set up and connect the plugin.

- Log in to the admin panel of your WordPress website
- Navigate to “Plugins” and click “Add New” at the top of the page
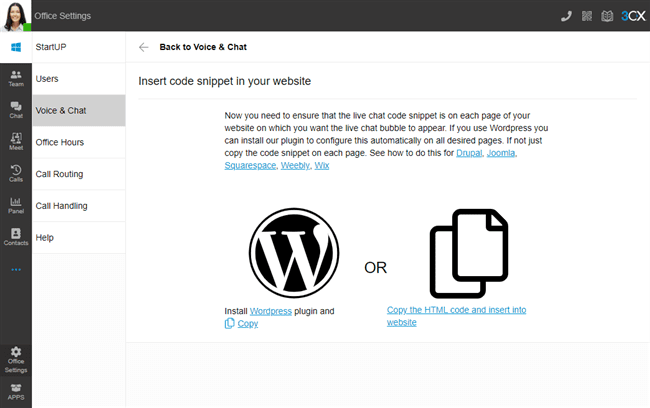
- Click on “Upload Plugin” at the top and choose the file you downloaded during the sign-up process beforehand. The same can also be obtained from the Web Client in “Office Settings > Voice & Chat” and click the ‘i’ icon next to the pencil icon. Then click “Install Now”
- Once installed, click on “3CX Live Chat NextGen” in the sidebar
- Paste the URL you copied earlier (the 3CX Talk URL). If you haven’t copied it, you can find it again in the Web Client in “Office Settings > Voice & Chat” under the “Information” field or within the confirmation email sent during the setup process.
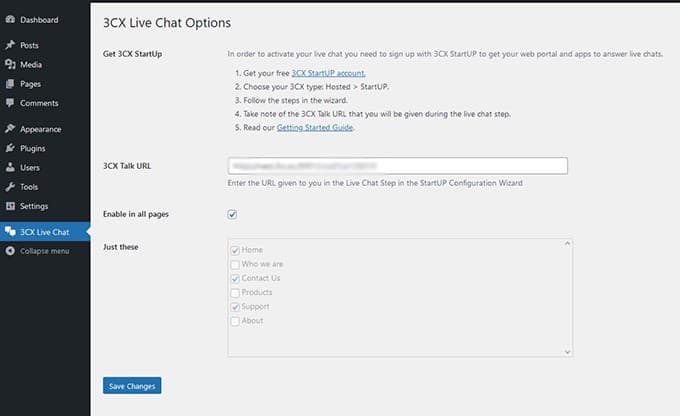
- Either tick the box to show the chat on all pages or use the tick boxes below to select individual pages. Finally, click “Save Changes” and you’re done.

To begin with the live chat, you need to install the plugin on your WordPress site. Log into your WordPress dashboard and click the ‘Add New' button in the Plugins area. You can find 3CX Live Chat by searching by keyword. You'll be sent to a setup wizard after clicking the ‘Install Now' button and then ‘Activate.'
Advanced Settings
In the live chat section, choose Settings. Now you have access to many more options that you can tweak to your preferences, such as:
- Enable/disable live chat on smartphones
- Enable/disable live chat on specific pages
- Offline messages control
- GDPR support
You can also choose other colors and add auto-response and welcome messages under the Styling option. Alternatively, you may put “no response” at the end of the message text.
In the chatbox option, you can personalize the chatbox even further. You can use a pre-populated minimized bubble icon or even upload your icon. You can then set the logo of your organization. Lastly, you can add an agent default picture that the plugin will show alongside to the greetings messages.
Elevating Live Chat to Call
One of the best features of this plugin is the ability to elevate from simple chat to a call or video call. Sometimes a situation requires something more than a chat, which is an optimal solution to that problem. Since both audio and video calls are carried out through browser, there will be no additional charges for neither the company nor the customer.
Furthermore, you have to go to Advanced Features and click the “Video, Phone and Chat” button to enable elevation, as shown in the image below. With this option available, your visitor can make a call or video call directly from chat.
Mobile Apps
This option lets you and your agent reply to chats on the go. You can use it both on Android and iOS operating systems. Setting up mobile chat is quite simple: install the app and scan a QR code from the web client and your account will be automatically configured and you are all set to go.
3CX Web Client
The 3CX Web Client adds even more value for businesses using the plugin and its features. Designed to cater to small businesses alike, it’s a much more streamlined and simple piece of software, aimed to centralize all business communications in an all-in-one interface. . Th Even multi-channel communication isn’t an issue thanks to CRM, Facebook, and SMS integrations. This means that you can use one single app to respond to customers using different channels to reach you.
Aside from being an app that unifies your channels in one place, the web client also vastly improves your accessibility. It is designed to scale to any device/screen and since WordPress has serious limitations displaying on smaller screens with limited navigation options, the client gives you a perfect alternative to stay in touch anytime and anyplace.
3CX Pricing
The 3CX StartUP package is one of the most popular options amongst smaller companies. It is a perfect way to get started, especially with a forever free package for up to 10 users – 3CX StartUP free. It offers a small ‘cloud-native’ PBX solution that’s hosted on a shared instance. It includes features such as video-conferencing, a ring group, an auto-attendant, 3CX Talk URL, mobile apps, and of course – 3CX Live Chat.
For more users or more advanced options, businesses can also opt-in for the 3CX StartUP PRO version. Besides being able to accommodate up to 20 users, it also includes multi-level IVR, call queues, and reporting.
| STARTUP FREE | STARTUP PRO 10 | STARTUP PRO 20 |
| Shared Instance | Up to 10 users | Up to 20 users |
| Up to 10 users | Own SIP Trunk | $250 |
| Video conferencing | Multi Level IVR | |
| 1 Ring Group | Call Queues | |
| 1 Auto-attendant | Reporting | |
| 3CX Talk Links | $150 | |
| Live Chat | ||
| Mobile Apps | ||
| $0 |
For larger installations, companies can opt-in for the traditional 3CX Pricing Plans for a dedicated instance with on-premise, hosted, and cloud options included. These are based on the number of simultaneous calls instead, helping businesses reduce their telco spending by ditching the per user, per month pricing model for good.
Conclusion
As seen in this review, the 3CX Live Chat plugin showcases multiple excellent features that can help you engage with your visitors and help them out. With the help of an installation wizard, you can easily install the 3CX system and the plugin and the web client, which work in tandem as the perfect combo. All you have to do is customize your chat, tweak some settings, and you are all set up.
Again, one of its most significant upsides is the option to elevate the live conversation to a call or a video. All in all, if you are searching for a flexible and reliable chat option, 3CX Live Chat is the best there is.