

Maps are everywhere nowadays. They’ve found their way in almost every site header or footer and show a physical location you can visit. Since we’re not yet completely dependent on shopping through the web it comes as natural that businesses want you to know how you can reach them if you must. But the usage of maps doesn’t stop just at businesses like that.
There are numerous services that provide you with information connected precisely to your location and your surroundings. Knowing where to shop, where to eat, or what’s interesting to visit are all aspects crucial for having a good time when visiting somewhere you’re not already familiar with.
Among the platforms that provide the map base, one that stands at the forefront, is Google maps. You’d be hard-pressed to find someone who hasn’t, at some point, used it in one way or another. Also, because it so widely used, the platform offers the most support to those that want to incorporate it into their work.
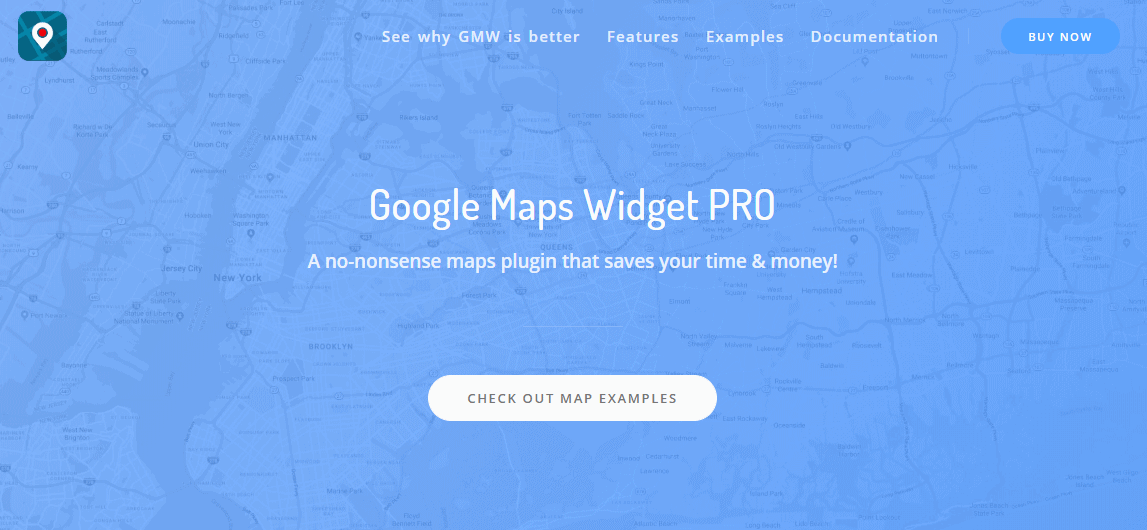
When talking about WordPress, there’s an abundance of plugins that will enable you to use Google Maps on your site. And after much research, we’ve found that one of the best is Google Maps Widget.
In this article, we’ll focus on the plugin's ability to make maps with multiple locations, but we’ll also talk about its other features we’ve found interesting. So let's dive in!
Maps done easy
The GMW plugin offers a great chance even for beginners to feel like WordPress veterans because of the sheer simplicity behind its workings.
Standing between you and a fully functioning map on your site lay just a few clicks and that’s the beauty of the plugin. Features can be added to or removed from your maps, and the process of making a map is exceedingly easy.

If you’ve ever used widgets in WordPress, you’ll be familiar with the way they’re incorporated into the site, how you can move them around, and how to change the basic attributes. For those who aren’t familiar, it’s basically a list of drop-down menus where you get to set up how the widget will look and behave.
Outside of a few settings, this will be where most of the map tweaking will occur.
Thumbnail map
The thumbnail map tab is the first thing you’ll need to set up as it’s also the first thing your visitors will see. Just as the name suggests this represents a thumbnail preview of the interactive map where all the details are. Make no mistake, you could use this in a limited capacity with the more basic functions, but you should treat it as a preview, unless you forgo to use it altogether, and swap it for the interactive map immediately which is also an option and emphasizes the nature of the map.
If you do opt to use the thumbnail map, you’ll get to choose four different types that are essentially different display options – hybrid, road, satellite, and terrain – all your usual options you get with Google maps.
There’s an additional fifth option where you get to keep the function of the thumbnail, but instead of a map, you will be displaying a static image. The interactive map will be linked to the thumbnail in either case.
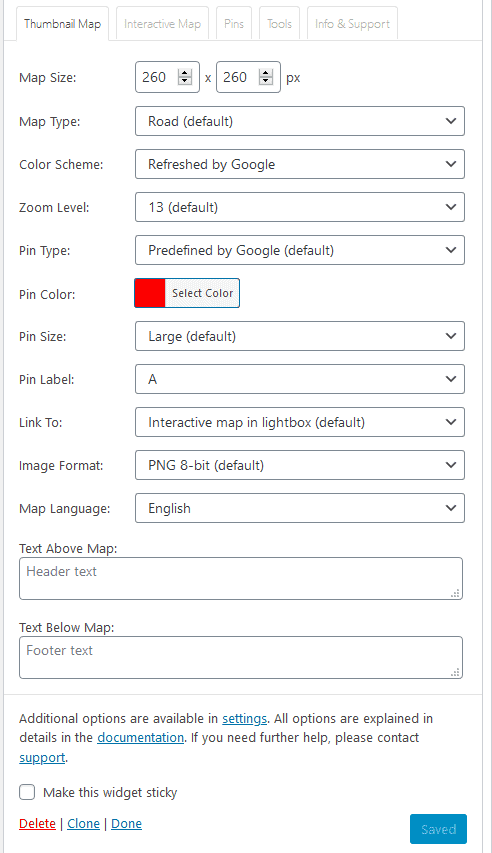

As the thumbnail acts primarily as a link, probably the most important decision to make is how you’ll use that link. The default and most used option are to open an interactive map in a lightbox. Alternatively, you can make it open an interactive map in the same space as the thumbnail.
Also, as we’ve mentioned, you could replace the thumbnail with the interactive map altogether. There’s even an option to link the thumbnail to a custom URL (in the same space, or a new window) or disable the link entirely. All of these are legitimate options to use depending on your preference.
Rounding it up, you’ll put your finishing touches on everything by choosing the language, inserting the text above and/or below the map, and deciding on the image format (smaller images of lesser quality, or larger of better quality).
Interactive map
Building our way up, we’ve finally come to the defining feature of the Google Maps Widget plugin – the interactive map. This is where you’ll be creating maps with multiple designated locations through various means.
The type of display you had with the thumbnail map is now limited to a road or satellite view, but this is the less important characteristic, what is important are the modes of the maps you’ll be able to use:
- Place – the default option that pins the address you’ve designated to be shown
- Directions – shows the path from the designated address to the newly entered start address
- Search – displays a search box with results displayed on the map (limited to the designated address)
- Street view – displays the designated location in street view mode (you can set the angle)
- View – the map is shown with no markers
Just like the thumbnail types, every option here is a fine choice depending on the situation and each choice does serve a purpose.
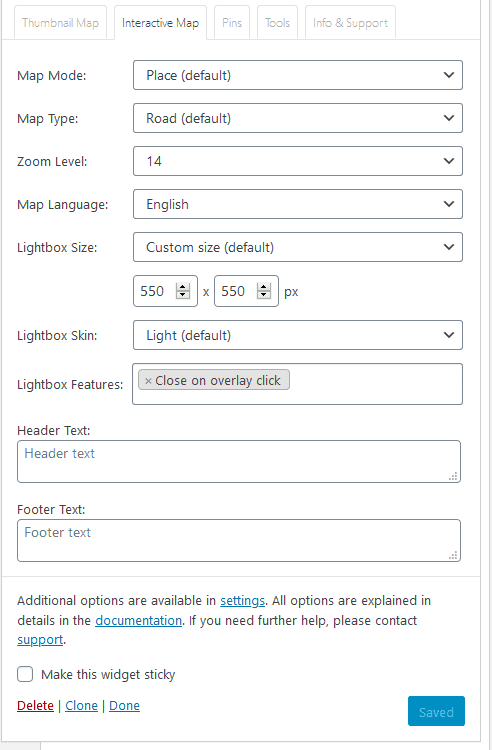

- Close on overlay click
- Close on Esc key
- Show map title
- Show close button
Again, depending on how you want your map to look and how you want your users to interact with it you’ll be able to mix and match the settings to find the perfect solution.
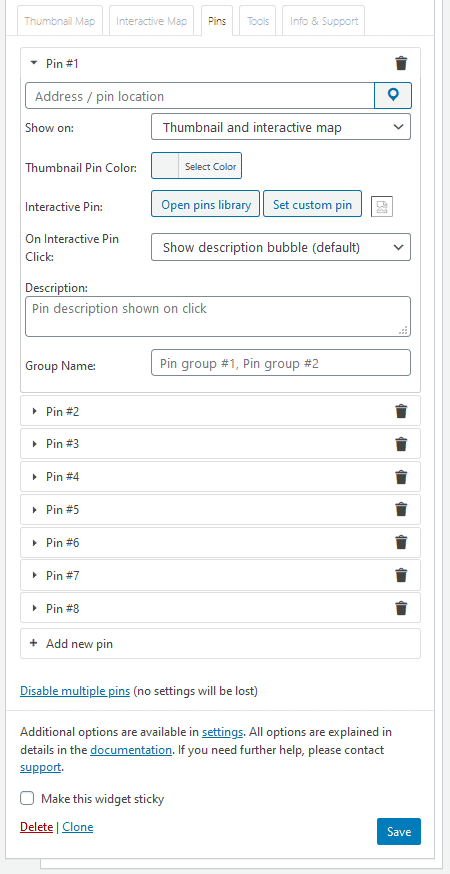
Pins for days
By now you have the gist of how maps are inserted into your pages and how you can customize them, next, we’ll cover pins.
On first thought, pins seem irrelevant in the grand scheme of things, but with the Google Maps Widget plugin they are fully utilized and become much more than just place markers.


To use multiple pins, you’ll need to enable them first. Once enabled, the unified designated address is removed and you can insert pins separately. Addresses can be inserted for each pin, so there’s no need for an overarching one and you can choose whether the pins are visible on the thumbnail map, interactive map, or both.
Since the thumbnail map is relatively small, if you’re using a lot of pins it’s sometimes better to view them solely on the interactive map.
After you’ve entered the addresses and decided how the pins will be displayed, you’ll need to set up how they’ll look and what features will accompany them. There is a library of over 1500 different pin variants available for you to use and you can also import your own image.
As expected, you can set the color for each of those. Also, pins can be made to show descriptions or open URLs (in a new window/tab, or the same) once the visitor clicks on them. This enables you to provide even more information and have even more control over the information flow in your maps.

Once you’ve enabled and fully set up your pins, you’ll have new options available to you back on the interactive map. Your access to modes will expand to include hybrid, road, satellite, and terrain. Furthermore, display and user interface options will be expanded with things like optional layers for traffic, transit, or bicycle tracks and scrolling, zooming, keyboard shortcuts, etc.
Everything mentioned is certainly great, but what you’ll really want to use are the newly enabled clustering and filtering features!
Clustering
By using clustering you’ll get to group pins together on the map. As you’re zooming out there will be fewer clusters present, but they’ll encompass more pins, whereas if you zoom in the cluster will increase in number but decrease in size until your so close that the pins will be displayed again.
If you think this is some complicated feature where you’ll lose hours and hours of your time, think again. You’ll be surprised to hear that it’s done automatically and all that’s required of you is to choose the cluster radius from a drop-down menu (again, back in the interactive map section).
The radius you’ll have to choose is in fact the point at which pins are grouped – a small radius will group them only when zoomed out, while a big radius will keep them grouped even when zoomed in (to a certain degree).
Filtering
Using multiple types of pins will mean your map will get cluttered pretty easily and your visitors won’t be able to see what they need to see. To counter this, you can implement a filtering option so anyone can focus on what they want.
Just like with clustering, you’ll need to enable the filtering option in the interactive map tab. After that’s done head back to the pins tab and enter the name of the group for every pin you want. It’s really that easy – all the pins within the group can be filtered in the interactive map from now on.
Create multiple groups for even easier searching and make it that much easier for all visitors to use your maps.
Final thoughts
Maps shouldn’t be just an afterthought with a pin on the location(s) where people can find your business. Why? Well, because they’re tools that should be used in a variety of ways, which provide many services that will make life easier for your customers/visitors.
If you managed to get to this part of the article, you now have both the knowledge and the perfect tool to make maps that show that extra information and that bit of extra effort on your part.
Displaying these intricate maps with Google Maps Widget will take your site to the next level and we’re sure you’ll see the difference both short-term and long-term.