
Even before I started working with WordPress, I cannot tell you the number of times I’ve seen people losing their memorable photos they took years ago or a video that always comes out in all family gatherings – the same thing applies for websites.
If you have a website, you should know how fragile it can be. A simple error during upgrade can potentially cause data loss. Next comes the threat of cyber-attacks and malfunctioning plugins that usually compromise your website’s security and customers’ data.
In this article, I will tell you how you can back up your WordPress website using different ways. Note that your WordPress hosting provider should offer a dedicated backup process as part of the standard hosting package. If this is not the case, read on!
This article will cover the following topics:
1. Back up WordPress with UpdraftPlus
At the minimum, any WordPress backup plugin should offer two functionalities: the ability to schedule backup frequency and copy all the important files. In my opinion, the best plugin that offers both these functionalities (and much more) is UpdraftPlus.


UpDraftPlus simplifies the backup and restoration process by storing website backup in the cloud (Amazon S3, Dropbox, Google Drive, Rackspace Cloud Files, DreamObjects, FTP, SFTP/SCP, WebDAV, OpenStack (Swift), Microsoft Azure, email, etc.
You can restore your backups with a click and schedule a regular backup of the website’s database and files. This is a great way of ensuring that you always have a recent copy of the website data at hand. Many users prefer to maintain a weekly backup schedule to make sure the backup file reflects the most recent website changes.
Plugin Installation
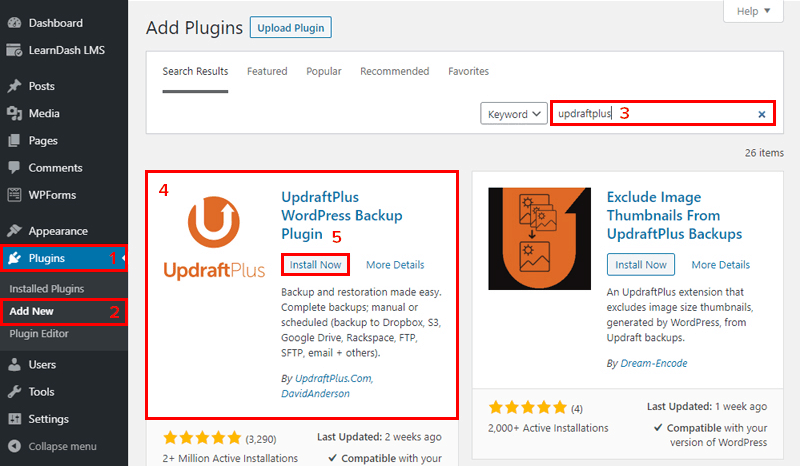
Go to your WordPress Dashboard → Plugins → Add New → type “updraftplus” in the search box. Once you find the plugin, click “Install Now.”

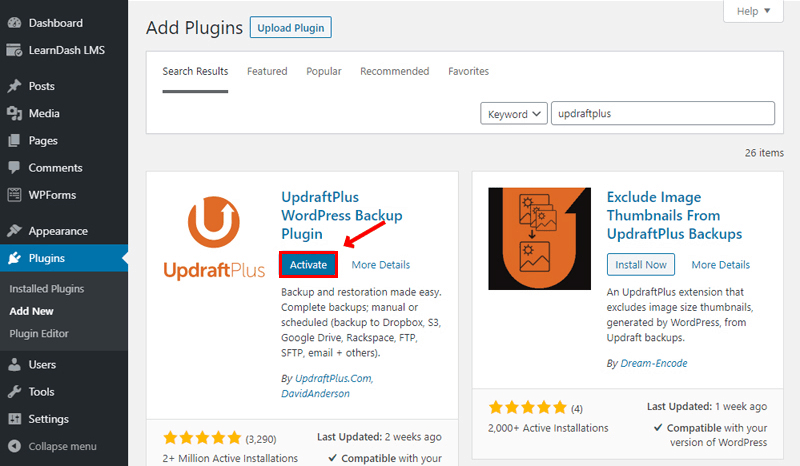
In the next step, click “Activate.”
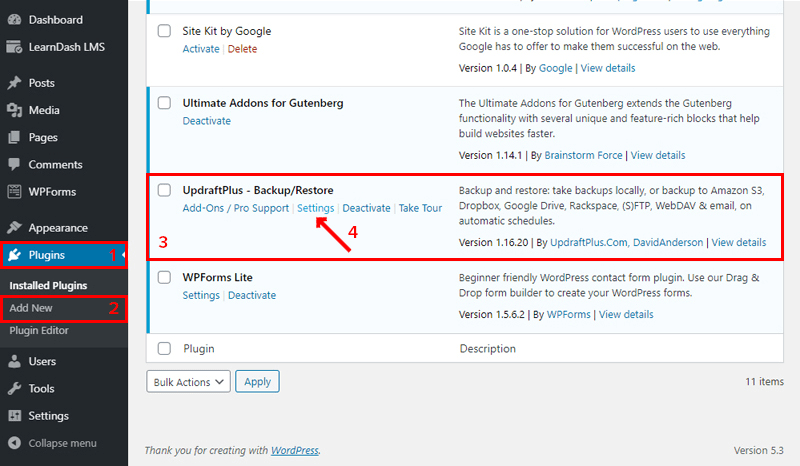
After that, go to your WordPress Dashboard → Plugins → Installed Plugins → UpdraftPlus – Backup/Restore → Settings.
In UpdraftPlus settings, you will see five tabs. The last one is not important since it only shows you a comparison between the free and the paid version. And since my focus is also on WordPress backups, I will now discuss the “Backup/Restore” and “Settings” tabs respectively.
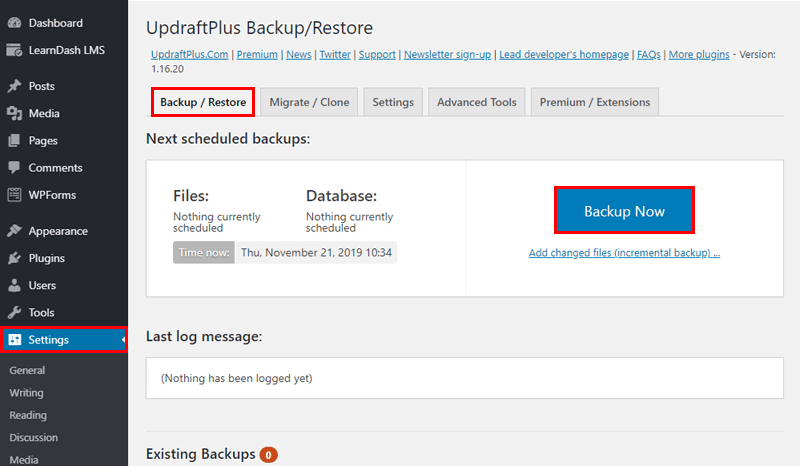
Backup/Restore
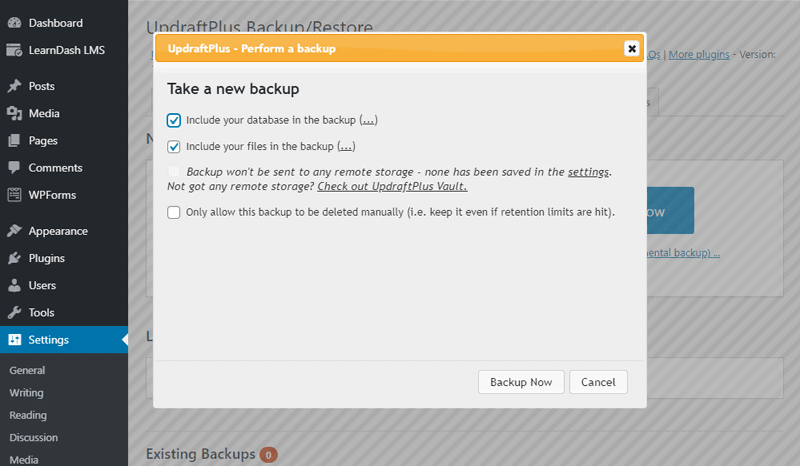
To see how easy UpdraftPlus is, I will make the first copy manually, a very useful option if you are about to make crucial changes to your website. Go to your WordPress Dashboard → Settings → UpdraftPlus Backups → Backup/Restore → click “Backup now” and select the files you want to include in the backup.
The plugin initiates the manual backup process and the backup will be ready in a few minutes.
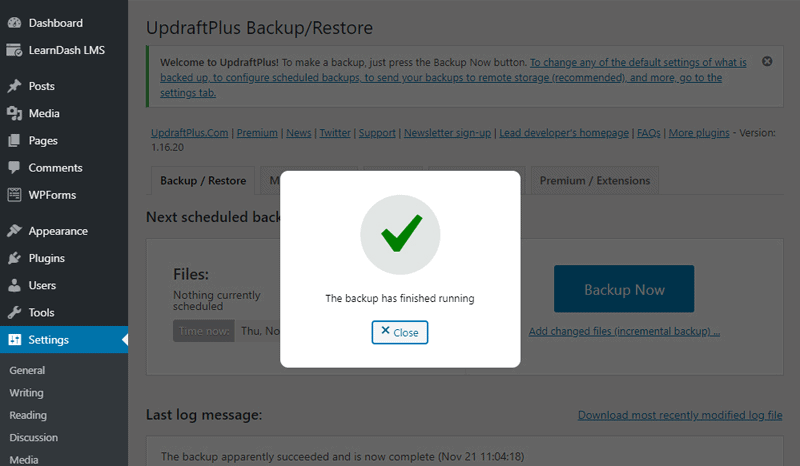
In the next screen, you will see the notification “The backup has finished running”. This means your WordPress backup process has been completed. Click the Close button to dismiss the alert.
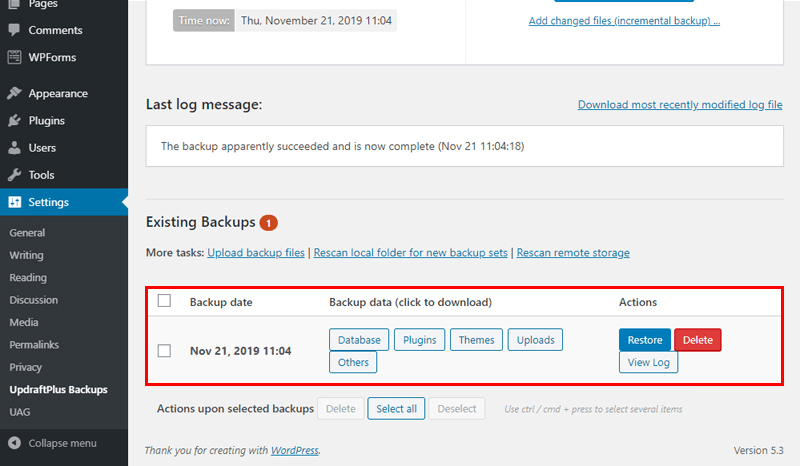
If you scroll down the page, you can see the existing backups, the contents of each backup (Database, Plugins, Themes, Uploads, Others), the option of restoring a backup and deleting the outdated backups.
Settings
In this tab, you can configure the settings for backups (and the plugin). You can select how often you want to take backups (from 2-hour to monthly basis) and how many backups you want to retain. A common combination is a weekly backup with at least three previous versions.
The database usually undergoes changes more frequently than files. If you update the website every 15 days, you can take a backup at a 15-day interval.
One of the outstanding features of UpdraftPlus is that it allows you to save backups on cloud storage platforms, such as Google Drive or Dropbox. To enable this option, you first choose the storage platform you want and then click “Save Changes.”
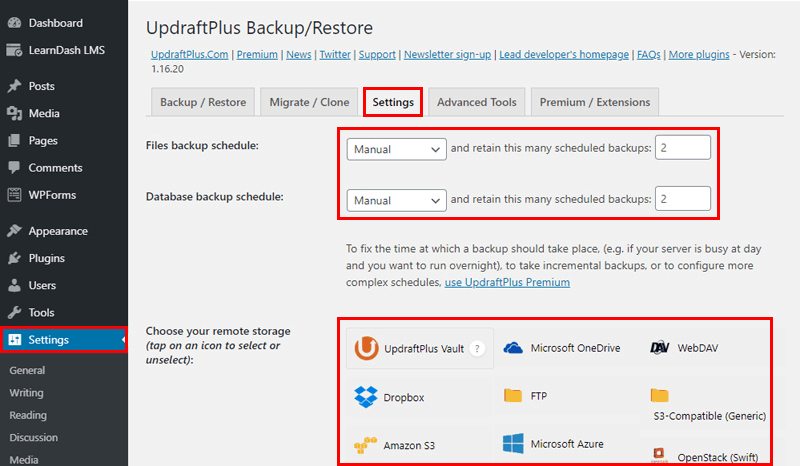
If you continue scrolling in the “Settings” tab, you will see more options to optimize the plugin configuration.
2. Back up WordPress Automatically (via your hosting provider)
Having a hosting solution that cares about the backups of your website is very important because of the very convenient processes. You won't have to worry about scheduling backups for your website, and you can restore without any worries.
Cloudways – Managed WordPress Hosting
Not only Cloudways is my preferred hosting provider, but it is also my primary recommendation for hosting WordPress websites. One of the many reasons I prefer Cloudways is because it offers backups/restores with just one click.
If you’re also a Cloudways user, simply log in to your account (if not a user, start a 3-day free trial).

Server-Level Backup
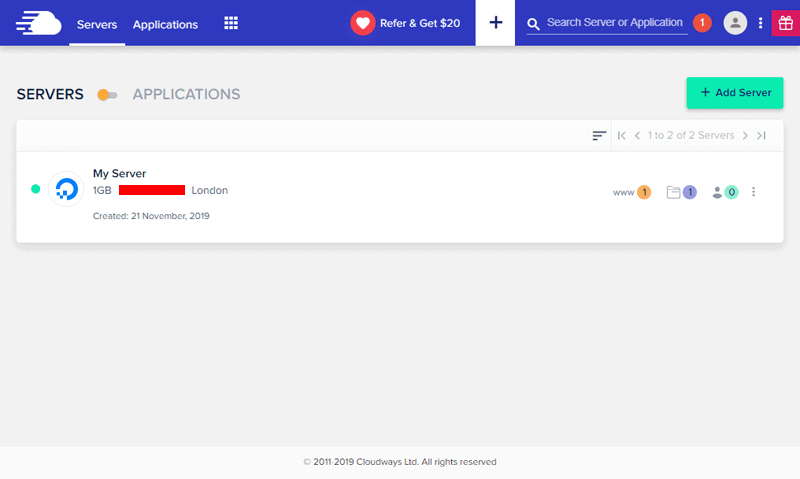
Click the server you wish to backup.

On the next screen, go to Server Management → Backups.
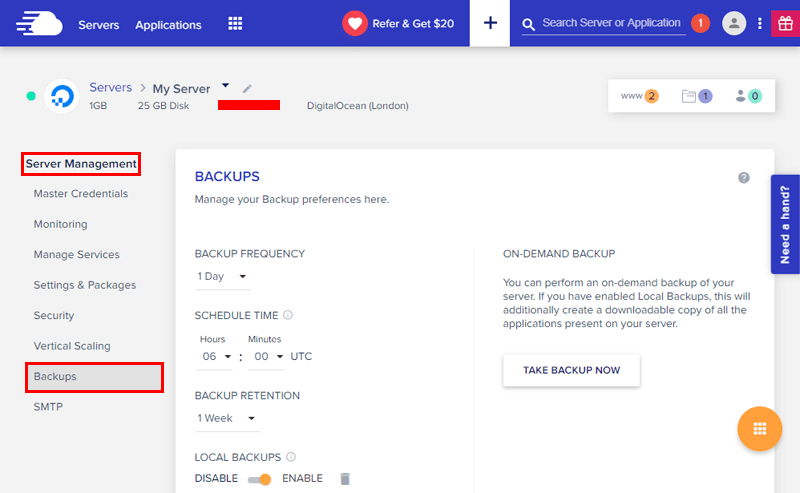

Here’s a brief explanation of the on-screen parameters:
- Backup Frequency is between 1 hour to 7 days.
- Schedule Time for automated backups.
- Backup Retention from 1 week to 4 weeks.
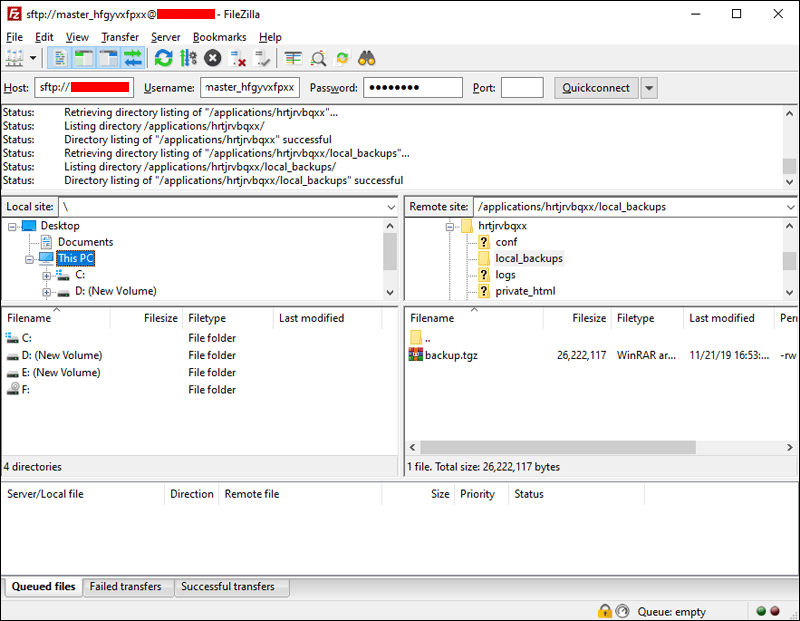
- Enable Local Backups to back up via SFTP (usually .tgz format).
- Use On-demand Backup to back up your server immediately.

Application-Level Backup
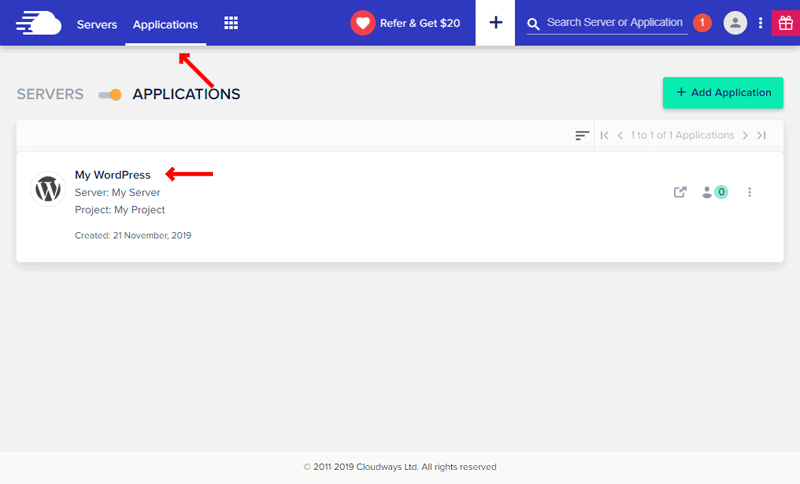
Go to “Applications” from the top menu bar and then select the WordPress application.

On the next screen, go to Application Management → Backup And Restore.
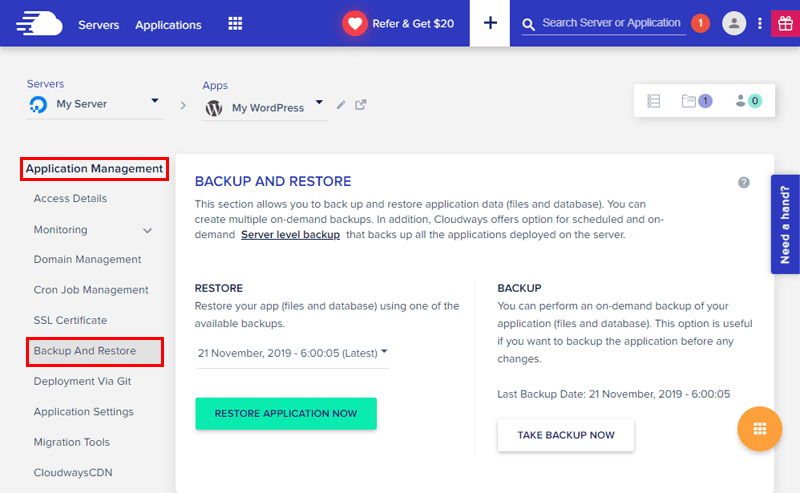
Not only you can back up your WordPress website from this screen, if the need arises, you can also restore it from the same tab.

3. Back up WordPress Manually
There are three file folders that should be protected when creating a WordPress backup manually. All three are found in “wp-content” and are: “themes”, “plugins” and “uploads”.
If your website does not have many images and you do not frequently make changes to your theme, or install plugins regularly, one backup every month is enough to have reliable protection against disaster.
Even in the case of the uploads folder, you can make an incremental backup; only those files that you have created since the last time you made a backup should be included in the backup.
When backing up a WordPress file, always remember to include two files that are essential for the website operations: .htaccess and wp-config.php. These files are usually located in the root folder. If you wish, you can also include any files you wish to include in the backup archive.
Create a Backup
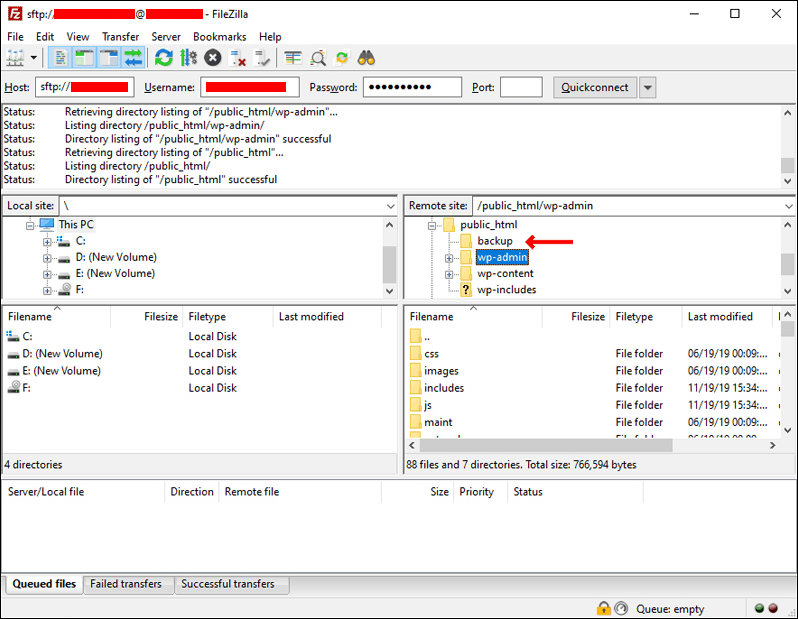
Go to your WordPress root directory (via any FTP client), open the “public_html” folder, and you will see something like this:


Click the button in the upper left “Create directory” and give it the name you want, for example, “backup”. The new folder will be created in the “public_html” folder.


Now select all the files inside “public_html” (except the folder you just created). You can use the “Select all” button or select them one by one by holding down the “Ctrl” key on your keyboard.
With the files selected, hold down the “Ctrl” key on your keyboard and drag them to the “backup” folder (in my case, “/public_html/backup”).
Once you have all the files copied in the backup folder, you can make the changes you need on your website without fear of data loss. If the changes you made didn’t break the site, you can delete the “backup” folder.
Well, now you know how to back up your WordPress website by saving the files and database of your website. As you can see, it is not necessary to use any plugin and it can be done in just a few minutes (depending upon the size of the files you wish to include in the backup). Note that if the backup frequency is high enough, you should automate the process and avoid the manual backup method.
Wrapping up!
I hope by now you have learned the value of backups and how to manage the WordPress backup process (through a plugin and manually).
Always remember that prevention is better than cure and, above all, that you can sleep peacefully every night knowing that whatever happens, everything will be fine as you have a backup ready!
If you have any questions you can leave it in the comments and I will gladly answer you.
Author Bio:
Mansoor Ahmed Khan works for Cloudways – A Managed Cloud Hosting Platform for everyone: from individuals to businesses. He is passionate about technology, entrepreneurship, and marketing. His daily life is rocked by his family, projects, and his screen. Probably in this order, he likes to be convinced at least.